OK, I admit it. I’m a stickler for planning and details. For this trip, I had only about a month for planning, whereas I prefer to have a buffer of 2 months. In fact, my packing starts a month before the trip! While I’ve penned my ride experience in a separate post, this post focuses on the more mundane things like gear that I took along (a lot of which I didn’t need), route and weather planning, my altitude acclimatization, etc.
The Gear
Let’s start with the gear. In the narrative below, I have highlighted each of the gear items for easy reference of the reader to prepare a checklist.
Leave no trace
I’ll start with something that is dear to me and worries me a lot. In the trekking world, “Leave no trace” is a core belief. This means that we leave no trash. Unfortunately, if you look at the below picture during the Gata Loops climb, this isn’t a widely practiced belief.
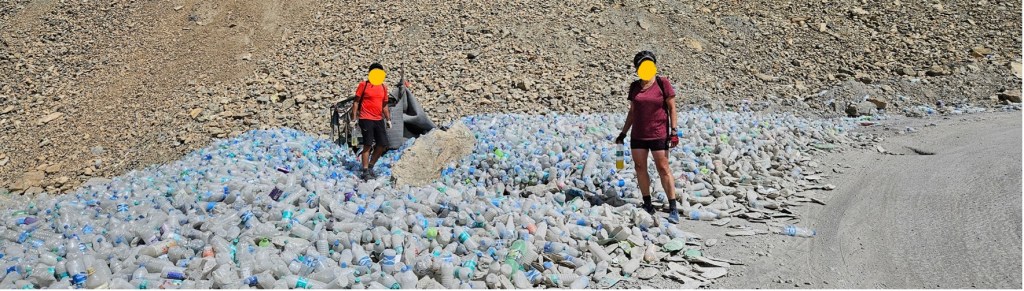
I always carry a garbage bag in my camp bag. Every bit of trash I generate goes into that bag at the end of the ride… this includes wet wipes, wrappers (from chocolates, energy bars, snacks or gels), disposable bottles (e.g. coke, mineral water) or tetrapacks (e.g. juices). Since I filter my own water, I generate no water bottle trash. This garbage bag with all its contents returns home with me for disposal. It’s not that I have a lot more confidence in the garbage handling systems of my home city. It’s a choice between the devil and the deep sea. I’d any day prefer to protect nature than a concrete jungle. Even leaving the garbage at the end destination, Leh, is not desirable because all these mountain regions have serious trouble handling trash, and you don’t want to add to their woes.
The Bike
I don’t own a mountain bike. I was hoping to be able to use my Specialized Roubaix Comp road bike, but that would have needed major modifications. I think the widest tires I could use is probably 35mm, and I wasn’t sure even that was suitable for those roads. Mountain bike tires seemed to be in the range of 60mm. Also, against my 52/36 crankset, I would need probably need to replace my 11-34 cassette with something dramatically larger. That would mean a modification of my derailleur too. All this seemed too much of an experiment when headed for a challenging ride like this one.
I rented a Scott Aspect 940 mountain bike. This was an aluminium alloy hardtail MTB with Shimano 36-22 / 11-36 gear train, Kenda 2.4” tires and hydraulic disk brakes. The bike weights 14Kg (as per catalogue). For most climbs, I was close to the 22-36 gear combination. I was happy with the gear combination and never felt muscular fatigue anytime during the expedition. My guess is that I was pushing the climbs at about 60% of my FTP. With my road bike, I would have needed a 56 tooth gear on my cassette to get anywhere near that ratio.
I attached a top tube bag to store riding essentials like snacks, sunscreen, ID documents, emergency contact details and cash. I normally prefer to carry at least two 750ml water bottles on the bike. But I realized that MTB seat tubes have difficulty to even accommodate a 500ml bottle due to the sloping design of the top tube. I had also packed a large saddle bag (including tools), a handle bar bag, and another top tube bag in my kit that I never used. On the other hand, some rags were useful when I had to handle the chain each time it dropped off. Since I was dependant on the support vehicle for any minor repair, I didn’t carry any tools, or spares, or a pump.
I had a Cateye Volt 500XC headlight on my front handle bar and a Cateye Rapid X3 flashing rear light on the back of my helmet for any emergency low light situations. And of course, I carried my own helmet with me. A bicycle lock was never needed and I didn’t carry one. But if it were my own bicycle, and an expensive one, I think I would have carried one in my camp kit.

Shoes and Pedals
I wasn’t going to do this ride with cleats. If the cleats weren’t set correctly on the rented bike, I would be setting myself up for injury over these long rides. However, I carried a pair of pedals for myself as I wasn’t sure of the quality of the stock pedals on the bike. Wasted effort, the stock pedals were absolutely fine.
I then had a choice of using my running shoes or my MTB shoes for the ride. I carried both. I preferred the running shoes because of their innate versatility. But in my early cycling days I had found that running shoes sometimes tend to leave my toes numb on a ride. The MTB shoes were a backup against this. After riding with my running shoes the first day, I found them to be just fine.
However, running shoes are inherently airy and on cold downhill rides, my toes were freezing up. I always carry a couple of plastic packets in my trekking gear as an emergency layer between my socks and my feet in case my socks get wet (from rain or an accidental step into a puddle). I tried using these on the cold windy rides. This definitely helped to some extent to protect my toes from the onslaught of cold air. But covering the full foot meant the feet couldn’t ventilate, and the insides of the packets were wet with sweat at the end of the ride. After a couple of days, I further improvised and cut the packet such that only the toes and half the foot was covered. This worked better. Thinking back, I realize that the B’s were riding with trekking / trail running shoes. Most likely that would provide better protection against wind and rain, and would also have helped with any interim treks during the ride (including amongst the rocks for nature’s call).
For socks, I started off with regular synthetic cycling socks, but switched later to Decathlon Hike 900 trekking socks that are a semi-warm wool blend.
I confess I carried my trekking boots too for the acclimatizing day trek at Manali. What a waste.
Electronics
I carried my Garmin Edge 1030 bike computer with its mount along with me. It was loaded with the route maps for each day. I also had my Garmin Descent Mk2i multi-sport watch that leaves my arm only during a ride and a bath. My Garmin HRM-Pro heart rate monitor also accompanied me. And I carried a non-drive side crank that had a powermeter, for power and cadence tracking. Yes, I am a data geek.
Unfortunately, the crank that I carried was a Shimano Ultegra for a road bike, and couldn’t be fitted onto an MTB. OMG, that was going to be a lot of missing data. My power numbers would be missing and my TSS (Training Stress Score) on TrainingPeaks (TP) would be a mess. This was sad!
But at least I had the HRM and I could use HR data for TSS estimation. At least, that’s what I thought. But I realize that TP is quite bad at estimating TSS from HR. I think it works when HR is at Z3 and above, and when the efforts are steady. But during this ride, my HR was largely in Z2 and TP was massively overestimating my TSS. So I had to painstakingly rescale the TSS measurements for each day after I got back home, using some generic thumb rules. More on that in a separate post.
The route mapping on the Garmin Edge served me well. The ClimbPro feature was especially useful to know exactly how far away the next climb was and how much of a climb was remaining. So for those wondering if a multi-sport watch would be sufficient for the ride, I would still recommend carrying a bike computer if it has the ClimbPro feature. What didn’t work well with the Edge was the elevation measurement. Oftentimes, if I paused the activity and restarted it, the elevation measurement would have drifted dramatically. The elevation gain measurement wasn’t too badly off, just the elevation reading. So every time we restarted, I would compare the elevation measurement with my watch and recalibrate the Edge, if necessary. The CimbPro was using the maps to predict the remaining climb information and that was always accurate.
The other aspect that didn’t work too well was the synchronization between the two Garmin devices. The Edge was the primary device during the ride, and the watch for the rest of the day. But with no internet connectivity on some days, these two couldn’t synch with each other. And since I am obsessed with data, I wasn’t getting training status and recovery period aligned. I also wasn’t getting the altitude acclimatization estimation to work right. The watch didn’t know that I had been slogging up a 5000m mountain, whereas the Edge didn’t know that I slept the entire night at 4500m. I had been really curious about how the altitude acclimatization numbers would change during the course of the expedition. But beyond a point the data was probably a bit sketchy.
When I do triathlons, my watch is the primary computer. On the bike leg, I use the Edge and the watch simultaneously. All sensors broadcast to both. I discard the activity on the Edge at the end, and save only on the watch. Maybe that is the operating model I should adopt the next time.
I had my Samsung phone with me at all times. I would keep it is Power Save mode, and only enable Phone, Messages, Gallery, Camera, WhatsApp and PeakFinder apps on the cover screen. The Always On display and Wifi were disabled. At nights when we didn’t have power, I would switch off the phone, and set my morning alarm on my watch. This way, I could stretch the phone battery up to 3 days of predominantly camera work.
The other gadgets were a Kindle (recently loaded with The Golden Road by William Dalrymple), a 10000mAh power bank, a pulse oximeter for SPO2 measurement, a multi-output USB charger, and charging cables for all. Then there is the headlamp (Decathlon HL500) that you strap around your head while you stumble in the darkness of the camp or dormitories.
The one completely useless thing I packed was my heavy Therabody massage gun. What I realized was that the ride is not much of a muscle strain. It is more of a breathing challenge. At no point did I ever feel any muscle fatigue. We always spent some time stretching after the day’s ride, and that was all that was needed.
I normally carry waterproof pouches (ziplocks) to keep my gadgets in my day bag. On cold nights, all my battery based gadgets go into a pouch and under my sleeping bag / blanket to be kept warm. Batteries discharge fast in the cold, and this was insurance against that.
Attire
I was riding in regular warm weather cycling bib shorts and jersey. Liberal use of chamois cream under the shorts was the norm. At elevation, UV exposure is a real threat, even in cold weather. The UV index was 10+ beyond 9 or 10AM. So, I had on Castelli UV protective leg sleeves and 3M UV protective arm sleeves the initial days. But when the cold was more than I could handle with this attire, I started to use my trekking pants over the bib shorts. I had a couple of pant clips to prevent the pants from getting entangled in the chain. The B’s were just tucking their pants into their socks… that options works too. And to protect my torso from the cold, I started using merino wool full sleeve thermal inners below my jersey, and an Endura thermal jacket over it. I had carried a high visibility vest, but never used it.
I normally don’t use cycling gloves since I find them inconvenient and rather useless. But again for the cold, I started using my Rab Power Stretch Pro full finger hiking gloves. I would have preferred something even more warm, but am not sure anything thicker would have allowed safe bike handling.
I wore a woollen beanie below my helmet at times, and a neck gaiter to cover my neck and ears.
For rain protection, I had my Rab Downpour hiking rain jacket and Decathlon waterproof over-trousers. These are best for heavy rains, and so I also carried a lighter cycling rain / wind jacket from Nothwave. I also had a helmet rain cover.
What I really haven’t figured is a good arrangement for protecting my face, nose and throat from cold wind, while also being able to breathe easily and not fog up my goggles. In the absence of this, I have suffered on this ride as well as on my Everest Basecamp (EBC) trek. In both cases, I got caught up with a dry cough. At least that didn’t prevent me from completing the EBC trek, but it did put a spoke in my wheel on this ride.
For Sunglasses, I had my trusted prescription sports glasses I got custom made many years back by sportrx.com. These have an Oakley frame and custom built progressive lenses that are also photochromatic. This meant that I could use it in all light conditions, and could read my bike computer data as easily as I was seeing the landscape or reading a restaurant menu card. These have served me well over the years on long endurance rides and runs, that typically start early morning before sunrise and go on well into bright mid-day sunshine.
For the camp, I had synthetic thermal inners, warm thermal socks, sandals, a nice thick padded / down jacket, a fleece jacket and woollen gloves. Apart from the woollen beanie for the ride, I also carry a monkey cap for the nights since the beanies have a nasty habit of coming off at night.
Regarding change of clothes, I prefer changing at least every couple of days, when possible. This trip afforded me that luxury since we didn’t have a weight limit on our camp bag. But otherwise, I have seen people going on the same clothes for even a week. I think the critical thing is to try and wash wherever possible. And with all the streams, or hotel accommodation, that was possible. Clothes seem to dry pretty fast even in that cold if put out early evening when the sun is out and the wind is howling. So I have found that carrying a few clothes clips and optionally, some washing liquid is handy. The other thing with using base layers is that merino wool allows extensive reuse without creating a stink. If they are put out to air whenever possible, they are good to reuse even without a wash. So I use merino wool base layers for the activity and synthetic for camp. And when using base layers, the outer layers don’t need change since they aren’t in touch with your body.
A second garbage bag is useful to stow away any soiled clothes that you do not intend to reuse. This just helps reduce the clutter in the camp bag because beyond a point, it gets difficult to figure which clothes are still unused.
Fuelling and Hydration
The crew assured us that the drinking water they were supplying was from fresh springs and was absolutely safe. But quality of drinking water is something I never trust, and if you get that wrong, it can ruin any holiday. I normally carry a 3L LifeStraw Peak water filter on all treks. My standard procedure has been to fill the bladder with the available drinking water, add Ef-chlor water purification tablets (chlorine based) to it for 30min and then filter the water out through the LifeStraw into the drinking water bottles. The Ef-chlor, at the recommended dosage does not alter the taste, so this way I am doubly confident of the water purity.
I rode with a 500ml cycling bottle with plain water, a 1.5L hydration backpack with plain water, and a 750ml cycling bottle with 2 tablets of FastandUp Reload electrolytes. On the hot days, I would try and finish all the electrolyte water. But on colder days, I’d probably use up only half. But overall, the target was to try and get in 3~4 L of fluids every day. In the car was 2 extra 750ml bottles of water for emergency use and for use at the destination. If we had more confidence in the proximity of the support vehicle, I might not have carried the hydration backpack on me, and would instead have managed with only a 750ml bottle of plain water and 500ml bottle of electrolyte water on the bike, with regular refills from the support vehicle.
I would also keep one of the 750ml bottles with me under my blanket or in my sleeping bag at night so I had some warm water to drink in the morning.
I carried a heap of energy bars and must have consumed about 30 of them, altogether. There rides are calorie heavy, but not much of a muscular strain. So, my preference is to avoid protein bars (also because too much protein stresses the digestive system), and instead go for energy bars. Chocolates are an option, but they tend to melt and become a mess. Since breakfast was too late and close to the start of the ride, I didn’t like to make that too heavy. So, I’d have one energy bar as soon as I woke up and typically a couple more along the route. In addition, I had carried energy gels (Unived Gel 180) reserved for the big climbs of the day.
Of course, there was also the calorie supply from the support vehicle. There was packed lunch, which was mostly not too great. It was typically one or two chapati rolls filled with potato, and was invariably cold and tough. Then there were apples and on some days, bananas. Occasionally we were served chocolates and juices too.
At the end of the ride, I would down a Unived Recovery drink. We were served tea and snacks (pakodas or maggi) in the evening, followed by an early 7:30PM dinner. We stuck to vegetarian food all along to not risk stale meat.
Bags
I had my oversized 120L duffel bag to carry the camp kit. This could take 25Kg of stuff. I think a 60L bag would normally suffice if one were to be a bit more conservative with the packing. Also, if twin sharing a tent, there really isn’t space for a super large 120L bag. I also had a backpack to leave in the support vehicle with extra water, rain attire, cold weather attire, emergency medication, extra energy bars, etc.
The sleeping bag was provided by Bikat, so I didn’t need to carry one. But I did carry a sleeping bag liner, that I never used on this trip or on any previous trek. I have been lucky to always get sleeping bags that are clean. But I did carry a hypoallergic pillow cover and used it at the dormitories since their pillows don’t see a wash the entire season. For the same reason, it is a good idea to use sleeping bags in the dormitories instead of their mattresses and blankets.
Miscellaneous stuff
And then there is all the other stuff that you need, notably a towel (light microfibre type), sports sunscreen (SPF50+), lip balm with sunscreen, toilet paper, wet wipes, toiletries and hand sanitizer. I got large 30x30cm wet wipes, and found them very convenient for the daily body wipe at the end of the day vis-à-vis facial tissue sized wipes. I also recommend a good moisturizer and a mouth wash in the toiletry kit. When the water is freezing, mouth wash is easier to use. A razor is not really necessary. An insect repellent is probably good to keep, though I never felt the need for it.
I would also recommend to always carry some form of Identity documents, and a piece of paper with emergency contact details and blood group, on you during the ride. Adventure travel insurance is also recommended. This insurance should specifically cover adventure activities upto 6000m.
Last, but not the least, is the medication. I normally carry paracetamol for fever or body pain, some Brufen for high altitude headaches, some medication for vomiting, loose motions or stomach cramps, and an anti-inflammatory for sprains. Apart from this, I had my regular Vitamin supplements, throat lozenges, some plaster, eye drops, and some diaper rash cream.
Weather Planning
I used Accuweather to do some early temperature recon. Sarchu was predicted at a maximum of -3°C and a minimum of -11°C. Riding at sub-zero temperatures wasn’t what I had signed up for. In fact, even Leh was predicted at +6/-7°C. When I asked the trek coordinator, he said that must be a mistake. Sure enough, we reached Sarchu at about 15°C and left the next morning at about 3°C. I think these weather forecasts can’t be trusted in those regions.
I normally use Epic Ride Weather for my detailed weather forecasting during long rides. This is a paid app, and I think this was closer to reality. The advantage with this app is that it plots a weather forecast all along the route starting from an expected time of departure, based on moving position based off the average expected speed. So you get temperature, precipitation, wind speed, wind direction and UV index forecast for the entire route as shown below i.e. a collation of a multitude of forecasts for various points of time in the day based on expected location at each of those instants. Note that you can only get upto a 10-day future forecast, and no beyond.
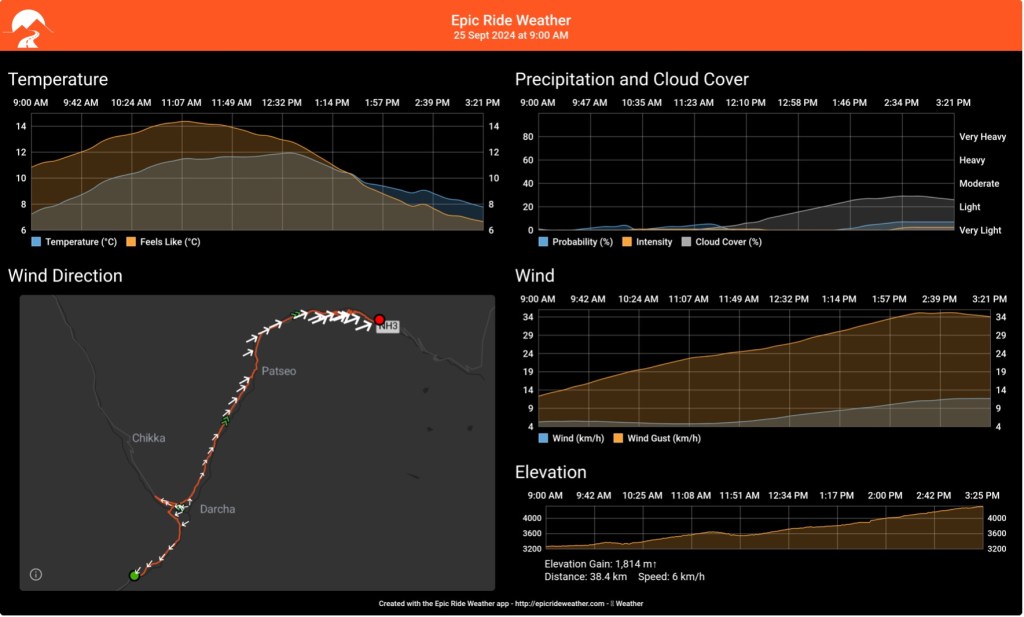
For best accuracy, it is best to pull the forecast as close to the ride start as possible. But since I didn’t have much confidence in the internet connectivity, I pulled all the reports before I left Manali.
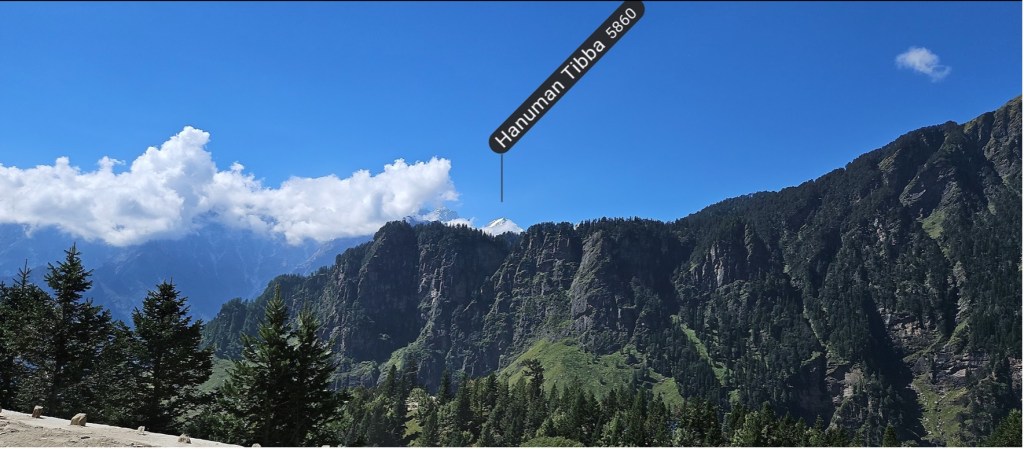
Mountain Peak Identification
During my Everest Basecamp trek last year, our Sherpa was using an app for identifying and pointing out the various peaks. I found it terribly interesting. When you see a snowcapped peak, you are always curious which one it is. I downloaded that app (PeakFinder) and have been hooked during mountain treks. The app augments the live picture with name and height stamps for the peaks. Within the app, it is a lot more dynamic. You click on a peak and it displays the exact distance of that peak from your location. You can even scroll and peep over the peak to see what else is behind it. Enthralling!

Altitude Acclimatization
I have always been intrigued by Garmin’s altitude acclimatization estimates. On this trek, I decided to study it closely. I wated to understand how it would trend over the course of the expedition, and how it decays after. This is what I found. The readings are from my watch.
| Day | Starting Elevation / Pressure (m / bar) | Peak Elevation / Pressure (m / bar) | Ending Elevation / Pressure (m / bar) | Acclimatization as per Garmin (m) |
| S-2 | 1880 / 0.80 | 2380 / 0.75 | 1880 / 0.80 | 950 |
| S-1 | 1880 / 0.80 | 1980 / 0.79 | 1880 / 0.80 | 1100 |
| 1 (S) | 1880 / 0.80 | 3250 / 0.67 | 3250 / 0.67 | 1350 |
| 2 | 3250 / 0.67 | 3970 / 0.61 | 3060 / 0.68 | 1700 |
| 3 | 3060 / 0.68 | 3430 / 0.65 | 3300 / 0.66 | 1950 |
| 4 | 3300 / 0.66 | 4270 / 0.58 | 4270 / 0.58 | 2150 |
| 5 | 4270 / 0.58 | 4820 / 0.54 | 4370 / 0.57 | 2200 / 2400* |
| 6 | 4370 / 0.57 | 4915 / 0.53 | 4760 / 0.54 | 2200** |
| 7 | 4760 / 0.54 | 5060 / 0.52 | 4650 / 0.55 | 2200** |
| 8 | 4650 / 0.55 | 5390 / 0.50 | 4170 / 0.59 | 3000 |
| 9 | 4170 / 0.59 | 4170 / 0.59 | 3550 / 0.64 | 3400 |
| 10 (E) | 3550 / 0.64 | 4611 / 0.55 | 3550 / 0.64 | 3250 / 3400* |
| E+1 | 3550 / 0.64 | 3550 / 0.64 | 270 / 0.97 | 3200 |
| E+4 | 270 / 0.97 | 270 / 0.97 | 270 / 0.97 | 2500 |
| E+8 | 270 / 0.97 | 270 / 0.97 | 270 / 0.97 | 1900 |
| E+15 | 270 / 0.97 | 270 / 0.97 | 270 / 0.97 | 1300 |
* These second set of readings are from my Garmin Edge bike computer. Since the watch and Edge weren’t synching on days that I didn’t have an internet connection, both had different readings.
** No change for 3 days, probably because this was data from my watch that wasn’t synching with the Edge.
I have included the pressure data in the above table from this web based calculator I like to use. This data should be read as a proxy for the Oxygen level at that elevation. For example, at 1880m in Manali, the pressure is 0.8 bar. This should be read as 80% oxygen level at that elevation, compared to sea level i.e. the body’s ability to use atmospheric oxygen is reduced by 20%.
A bit of a tech detail: At sea level, air contains 21% oxygen. As we go to higher elevations, this percentage doesn’t really change. What changes is the atmospheric pressure. As the pressure reduces, there is that much less molecules of “air” in the same lungful of air, and hence the body’s ability to absorb the oxygen reduces. Or in physics terminology, the partial pressure of oxygen is down from 0.21bar at sea level to 0.8*0.21bar at Manali. The lower partial pressure means that much less osmotic flow of oxygen in the lungs into the blood vessels.
The above acclimatization figures from Garmin is intriguing. We had been above 3300m almost every day since we started. But it still took all of 10 days to reach that level of acclimatization. My guess is that when Garmin says you are 3300m acclimatized, you are probably good to do a race or workout at 3300m at the same performance you would normally deliver in your normal homebase. And I can understand the need for such a long period. At 3300m, you are working with 65% oxygen efficiency. Your body needs to increase it’s oxygen absorption capability by 50% (0.65*1.5 = 1.0) to work like normal. It is not going to be able to produce all those additional red blood cells in just a day or two.
But then, what exactly do the single day acclimatization breaks do on a trek? My guess is that it is better than nothing. While there is probably some red blood cell buildup, those breaks also allow for general rest and recovery, But they aren’t fully acclimatizing you, in fact they are just partially acclimatizing you. Even with those breaks, one is at risk of AMS (Acute Mountain Sickness), and hence the need to be extra cautious and to get to lower elevations ASAP in case of AMS symptoms. I am reminded of an incident after my EBC trek. I met a couple of Swiss trekkers on the flight back home. A lady on their trek died. She showed AMS symptoms, but refused to heed the advice of the trek leader to descend to lower elevation. She stupidly continued the trek and collapsed. It was already too late and she didn’t survive. I wouldn’t be surprised if she had thought that her acclimatization days had secured her from AMS risk. The only real security from AMS is to take really long acclimatization breaks that run into days and weeks (like they do at the Everest basecamp before summitting the peak), or to take it nice and easy however fit you are. The fitter trekkers are probably more at risk because they tend to push harder than recommended.
Summary
When I started to prepare for this trek, I was plagued with innumerable questions. I overpacked to be on the safe side. That was a luxury I could afford on this trip. All my learning on this trip and from some of my past treks and rides has gone into this post. Hopefully this helps anyone else who may be in the same boat as I was before this trip.

Leave a comment